In the age of social media and digital photography, presenting perfect images has become more crucial than ever. Whether you’re a professional photographer or a hobbyist, photo retouching can elevate your images to the next level. This beginner-friendly guide will walk you through the essentials of photo retouching, helping you create flawless, eye-catching visuals.
Why Photo Retouching Matters
Photo retouching is more than just a cosmetic touch-up. It’s about enhancing the natural beauty of an image while maintaining its authenticity. Proper retouching can:
- Improve image quality.
- Highlight key subjects.
- Remove distractions.
- Create a polished, professional appearance.
Tools You’ll Need
To get started with photo retouching, you’ll need reliable tools. Here are some popular options:
- Adobe Photoshop: The industry standard for professional retouching.
- Lightroom: Ideal for quick adjustments and batch editing.
- Online Photo Editor Pro: A free, watermark-free online tool with advanced features.
- GIMP: A free, open-source alternative to Photoshop.
Basic Retouching Techniques
Here are the fundamental steps to retouching a photo:
1. Adjust Brightness and Contrast
Balancing brightness and contrast can instantly make your image pop. Increase the contrast to define edges and reduce flatness.
2. Enhance Colors
Use saturation and vibrance settings to make colors stand out. Be cautious not to oversaturate, as this can make the image look unnatural.
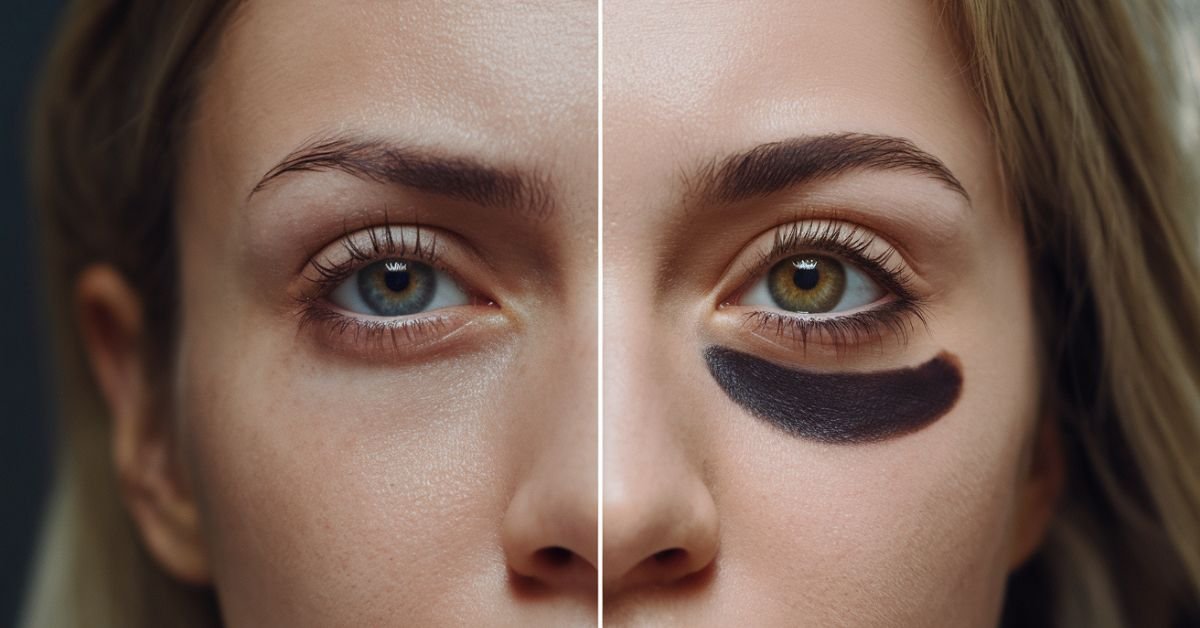
3. Skin Retouching
Smooth out blemishes and imperfections without losing skin texture:
- Use tools like the Healing Brush in Photoshop or the Skin Smoothing feature in Online Photo Editor Pro.
- Adjust opacity to retain a natural look.
4. Remove Background Distractions
Cluttered backgrounds can detract from the main subject. Use background removal tools to simplify and clean up your image.
5. Sharpen Details
Enhance the clarity of eyes, hair, or intricate patterns to draw attention to key features. Be mindful of over-sharpening, which can create noise.
6. Crop for Composition
Use the rule of thirds to crop your image for better framing and composition. Center your subject or align it with grid lines for a balanced look.
Advanced Techniques for Professionals
Once you’ve mastered the basics, you can explore these advanced retouching techniques:
- Frequency Separation: For detailed skin retouching without compromising texture.
- Dodge and Burn: To enhance highlights and shadows for a dramatic effect.
- Color Grading: Add mood and style to your images with cinematic color adjustments.
- High-End Retouching: Perfect for fashion and commercial photography, focusing on fine details.
Online Resources to Learn More
If you’re eager to expand your retouching skills, check out these resources:
- Tutorial Videos on YouTube: Channels like Phlearn and Piximake offer excellent tutorials.
- Blogs and Articles: Websites like Online Photo Editor Pro feature comprehensive guides and tips.
- Online Courses: Platforms like Skillshare and Udemy provide in-depth training.
Tips for Consistent Quality
- Work on high-resolution images for better results.
- Keep your editing subtle—less is more.
- Save your progress in layers to easily make adjustments later.
- Always view your edits on different screens to ensure consistency.
Conclusion
Photo retouching is an art that requires patience and practice. By mastering these techniques, you can transform ordinary images into stunning visuals. Start with simple edits and gradually explore advanced features to refine your skills. Don’t forget to use tools like Online Photo Editor Pro for an easy and efficient editing experience.